Monday, September 23, 2013

Congrats

Hello again!
I wanted to share my latest card:


The pink lines are embroidery floss- the Ipod camera doesn't show much detail :/


I'm entering this one in 3 challenges! I'm linking it up to:

Creative Fingers Challenge Blog
Challenge #3 Make it Shine (bling) found here:


Little Tangles Challenge #21: Color Combo of Yellow, Pink, and Gray found here:


papersweeties sketch11 Paper Sweeties Sketch Inspiration #11!
Paper Sweeties Sketch Inspiration #11 found here:


Friday, September 20, 2013

Back to School with Trendy Twine

I wanted to pop on here and share my entry for the current Trendy Twine Challenge.
For this challenge the recipe is:
   Back to school theme
   Primary Colors - some or all
   A,B,C or 1,2,3
   Trendy Twine


I didn't have any Trendy Twine for this color scheme so I used some embroidery floss in red, yellow, and blue and braided them together to make the bow.
The apple, pencil, and glue are paper pieced from the new release stamp set I'm Nerdy from Stamp Annie Thing.
The abc and 123 are from Tim Holtz Once Upon A Time die.
The card is a black cardstock base and I cut strips from wood grain scrapbook paper to frame it.
 
Join the Trendy Twine challenge here:
http://trendytwine.blogspot.com/2013/09/september-challenge-back-to-school-with.html


Thursday, September 19, 2013

Awesomely Autumn Card

Another card for you today. This one is extra embellished! It is full of autumn elements and super chunky with bling, pearls, and resin!


I'm entering it in 2 challenges:

Bling It Up Challenge at Through the Purple Haze found here:
 
Challenge #29 Flowers at The Crafter's Café Challenge Blog found here:
http://crafterscafeblogchallenge.blogspot.co.uk/   


Wednesday, September 18, 2013

Pink Birthday Card

Back again to share another card that I am entering in some challenges:


This card features a shaker filled with pink confetti balloons and a paper pieced cake.
It is a CASE based on Heather Ruwe's shaker post at Little Tangles and the cake image I used is a free digi stamp from Little Tangles.


Here's an up close pic of the paper pieced cake:


Here are the challenges I'm linking this card up to:


http://littletangles.blogspot.com/2013/08/birthday-bash-shake-it-shake-it.html  


Cake Stamp from Little Tangles
Sentiment Stamp unknown
Memento Ink in Tuxedo Black

Tim Holtz Dies: Once Upon A Time, Styled Labels, and Mini Labels
Crayola Pink Polka Dot Washi Tape
Confetti in Balloons and Stars
Hobby Lobby & Michael's Papers
Craft Foam from Dollar Tree


Tuesday, September 17, 2013

Halloween Card

I hate to be so brief but I am headed to my night class in a few minutes...
I want to share my card with everyone! I am super proud of this one- it is one of my best cards to date IMO :) It uses my favorite card making technique which is layering!
I am linking it up in 3 challenges!!
 

Here's my stash that I wanted to use for the card... I have seen so many wonderful projects using twine and sequins I have been planning to get on board with the trend. I have had these for ages but they have been very neglected. As for sequins this is my first time using them on a card!! So glad I did!


These are the challenges I'm entering it in! If you aren't too busy you can join in on the fun too! Thanks for stopping by :)

                                        
Use What You Have Challenge #16 Found here:
 http://www.sweetstampshop.blogspot.com/2013/09/use-what-you-have-challenge-16.html 

                                       
The Shabby Tea Room Week #184 The White Challenge Found Here:
And

My Crafty Spot Monday Challenge #111 Favorite Technique Found Here:
http://craftspotbykimberly.blogspot.com/2013/09/monday-challenge-111-favorite-technique.html  


Stamps used are American Crafts brand Spooky Night
Ink is Memento Tuxedo Black
Sequins are from My Craft Spot
Paper is from Hobby Lobby
Twine and Glitter Glue are generic 

Tuesday, August 20, 2013

The Un-Birthday Birthday Challenge

Here's my entry for the Un-Birthday Birthday Challenge taking place at the 


Join in on the fun herehttp://littletangles.blogspot.com/2013/08/birthday-bash-party-planning.html

I made this birthday card:


Using these unlikely stamp sets:


I used Stampabilities Fall Holidays for the leaves and the pie and I used Stampendous Snowy Short Stacks for the sentiment. I used Memento ink in London Fog, Angel Pink, and Rose Bud. I freehanded "birthday" with a Quickie Glue pen and coated it with glitter, then I used the same glitter to embellish the pie and add some steam.


Thursday, August 15, 2013

Vegan Potato Salad Recipe

I wanted to share a recipe with you that I am entering in the
Potluck Party Challenge over at the


I was super excited about the vegan shout out, being a vegan for 5 years myself!
I created this recipe to satisfy the nostalgic recollections of summer get-togethers- it is a great recipe for birthdays, picnics, BBQs, church socials, pot lucks, or whenever the craving may strike!


Vegan Potato Salad

          Recipe by: Emily Daniels

Ingredients:

            ~Makes about 7 cups of potato salad~
6 medium red or yellow potatoes (apx 3 lbs)

¾ cup chopped sweet onion

¾ cup chopped celery

¾ cup chopped dill pickles

All of vegan mayo mixture *recipe below* or apx ¾ cup Vegenaise

1/4 cup mustard

1 Tablespoon pickle juice

1 teaspoons celery seed

1 teaspoon kosher salt

1/2 teaspoon freshly ground black pepper

1 teaspoon paprika plus extra for garnish


Vegan Mayo Mixture

            ~Makes scant ¾ cup~

 1/2 cup canola oil

1/4 cup soymilk

½ teaspoon agave nectar

1/4 teaspoon sea salt

1/4-1/2 teaspoon apple cider vinegar


For the Mayo Mixture:

Combine all but vinegar in a blender.

Add apple cider vinegar a drop at a time until thickened.

Omit if using Vegenaise


For the Potato Salad:

Wash and boil potatoes with the skin on for apx 25-30 minutes or until tender when a fork is inserted.

In a large mixing bowl combine mayo mixture, mustard, pickle juice, celery seed, paprika, salt, and pepper.

Cut cooked potatoes into cubes and add to bowl.

Add onion, celery, and pickles to bowl.

Mix until well combined.


*Refrigerate mustard potato salad overnight before serving for best taste.

*Optional: Sprinkle with a dusting of paprika to garnish.


10 Minute Craft Dash #23 Entry

I wanted to share my entry for :


You can join the fun to by heading over to the site here:
http://prettypinkposh.com/2013/08/10-minute-craft-dash-birthday-bash.html

Here's my card which features my new Denami Big Chickie Stamp and was inspired by Paulina's card layout:


I made it in at a much safer time this round 9 minutes and 41 seconds!


I used a nice vanilla ice cream colored cardstock for the base which was cut out with my Sizzix. I then stamped on a multi-color background of cupcakes and just inside the card's edge I stamped multi-color candles! I also flocked the chickie and added glitter to the balloons and sentiment.
Note for next time- turn the fan off first!! I had a big fuzzy, sparkly mess to clean up :)
This was my first card using twine and I had a moment where I thought it was going to throw me over the time limit! Tying a bow under pressure is so much harder than one would think!
I think it turned out super cute though, well worth the sweeping!


Tuesday, August 13, 2013

Use What You Have Challenge #12 Entry


I wanted to show off my entry for Sweet Stamp Shop's Use What You Have Challenge #12! Challenge found here: http://sweetstampshop.blogspot.com/2013/08/uwyh12.html

My Stash: This is a gallon size Ziploc full of card fronts... yes, odds are if you have sent me a card, I've ripped off the front and crammed it in the Ziploc! I've been planning to do some crafting with these but haven't gotten around to it until now!!


My card: I dug around until I found some corresponding colors and used circle punches to layer them on! I can't wait to send it to someone!


Friday, August 2, 2013

Paper Sweeties Birthday Celebration

I just wanted to drop a line and let everyone know about the Paper Sweeties birthday celebration.
They are planning all sorts of fun things all month long!
They are even giving away the ENTIRE AUGUST RELEASE to one lucky person during a blog hop— there will be five sets released = $50 retail value!

Sunday, July 21, 2013

Challenge Entry

I made this card to fit the qualifications for 4 different challenges and also to be a birthday card for my granddad!


Here are the links to the challenges in no particular order:

 http://curtaincallchallenge.blogspot.com/2013/07/curtain-call-inspiration-challenge.html


  http://denamiaddict.blogspot.com/2013/07/birthday-celebration.html

Simon Wednesday Challenge Blog  http://www.simonsaysstampblog.com/wednesdaychallenge/

    http://trimmiescraftchallenge.blogspot.com/2013/07/challenge-216-18th-of-july-inspiration.html

Hambo Hoedown Entry

This is my entry for the Hambo Hoedown challenge. You can enter the challenge too here: http://hambochallenges.blogspot.com/

Every Wednesday!


The digi stamp I used is called WIND and is a freebie that you can get for yourself here: http://hambostamps.com/freebies/wind/

Saturday, July 20, 2013

My entry for Sweet Stamp Shop's Use What You Have Challenge #10


This is my entry for Sweet Stamp Shop's Use What You Have Challenge #10


You can enter it too here: http://sweetstampshop.blogspot.com/2013/07/use-what-you-have-challenge-10.html

I have had this pack of scallop circle cards for ages so it was great to use for the base of this. Add some embossing, ink, die cut letters. Then finish off with Valentine's Day confetti outlined with puff paint. I was inspired by the card on the challenge site :)

And (though it's an embarrassing mess right now!) here is my stash.


I was in school during spring cleaning so it got postponed. Now I'm crafting out of boxes while I try to get my office back in order!


Friday, July 19, 2013

Pretty Pink Posh 10 Minute Craft Dash #22


This is my entry for the Pretty Pink Posh 10 Minute Craft Dash! I came in at a time of 9 minutes 59.3 seconds! It was really close!! Next time I don't think I'll use embossing powder- it took my last 8 seconds :)
The challenge is to use the color scheme of coral, navy, and lime.


The challenge can be found here: http://prettypinkposh.com/2013/07/10-minute-craft-dash-22.html


Wednesday, July 17, 2013

Sky Themed Polymer Clay Charms

I made 2 sets of polymer clay charms with a "sky" theme.
 
The 1st set is a larger more 3D type of charm: 


The 2nd set is a smaller, flatter version:


Sunday, June 30, 2013

June Tim Holtz Tag

Here it is... my version of the June Tim Holtz Tag! Tim's version can be found here http://timholtz.com/12-tags-of-2013-june/


Grab your tag and a piece of white cardstock (Tim used watercolor paper but I didn't have any on hand.)


Trim the white paper to fit onto the tag and add the torn edge.


Using StazOn stamp your image(s) onto the white paper.


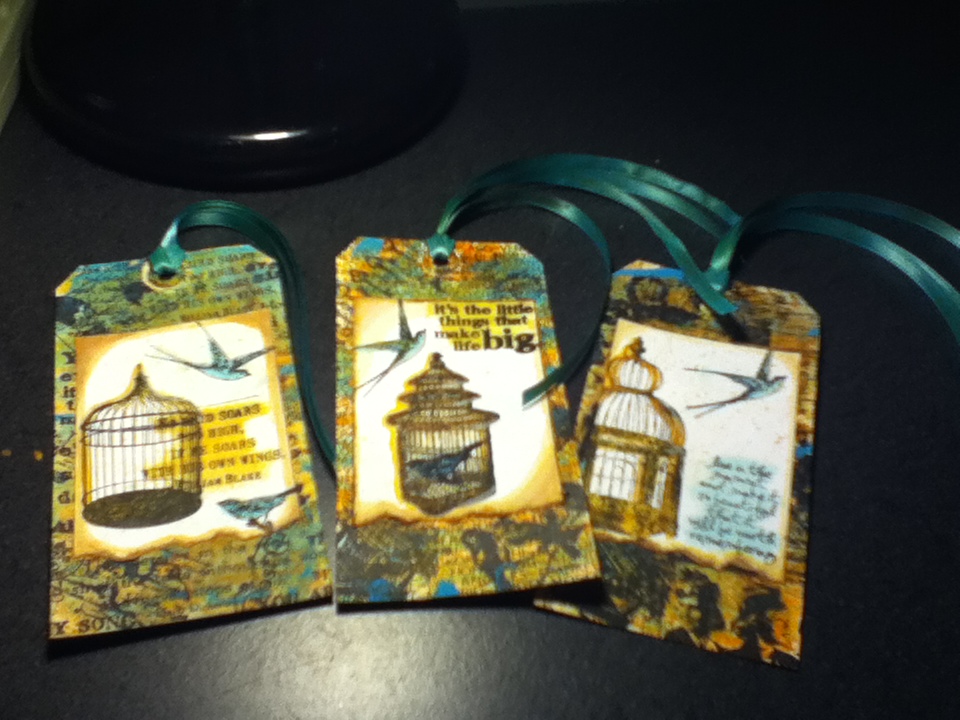
I used a combination of stamps to get a full picture that I liked.


This round I am making 3 (1 to send in the swap I'm hosting on Swap-Bot, 1 to keep, and a spare due to potential flakers like the flaker from the last swap)


Stamp a background layer of images/ words onto your tag(s) using the StazOn.


Add a second layer of images mostly around the egdes since that's the part that will be seen.


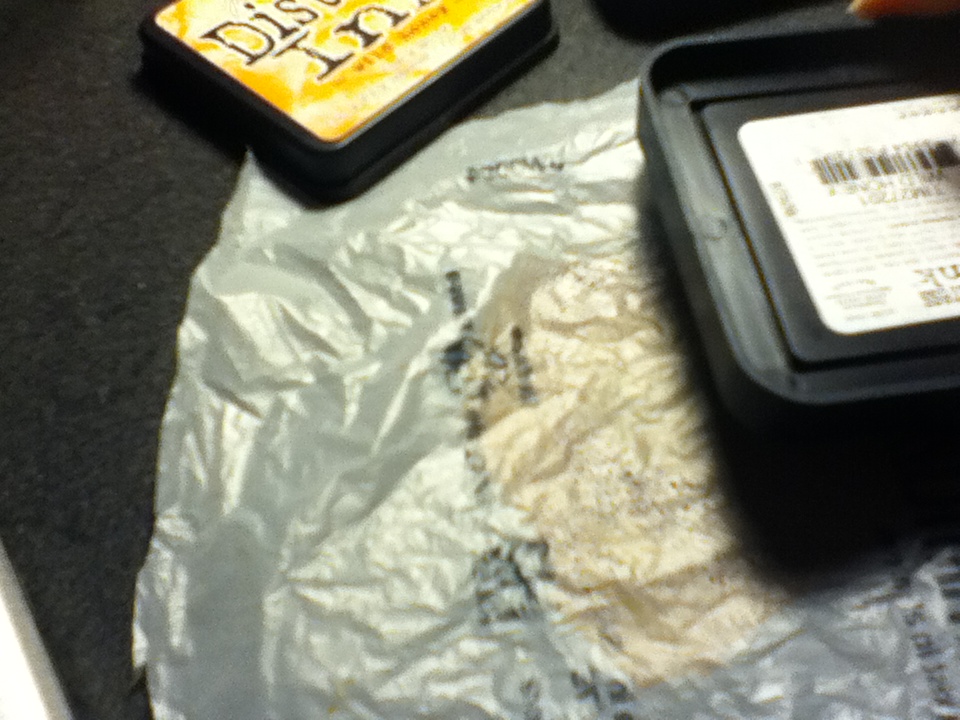
I added color to the background in layers... Taking a piece of wax paper I stamped some color (I'm using Vintage Photo here.)


Take a wet paint brush and run it across the ink to create beads of color.


Lay the tag face down in the ink a press on the back.


This is what 1 layer looks like.


I repeated this step using Wild Honey.


To add bits of opacity I grabbed my acrylic paint (I'm using Anita's in Island Blue) and a plastic bag from Michael's. I cut the plastic bag so that it would lay flat. Then using a wet brush I spread a layer of paint across the bag. The paint seperated a bit into the crinkles.


Press the tag, face down into the paint.


Repeat for as many tags as you're making.


To color in my images on the white paper, I am using a paint brush. I cut another piece of plastic bag and stamp some color onto it.


I then spritzed the ink to make it resemble watercolor paint.


I'm using Wild Honey, Vintage Photo, and Tumbled Glass.


It paints on very nicely.


I tried to follow Tim's directions for how he filled in his image.


For the white bits I just used some white water color paint.


I attempted to get the white in the right spots!


I then glued the white paper to the tags using so Aleene's Tacky Glue.


For the ribbons, I had some blue ribbon on hand that went well with the blue I used in the tag. To make it match better, I alternated sponging on some Wild Honey and Vintage Photo ink.
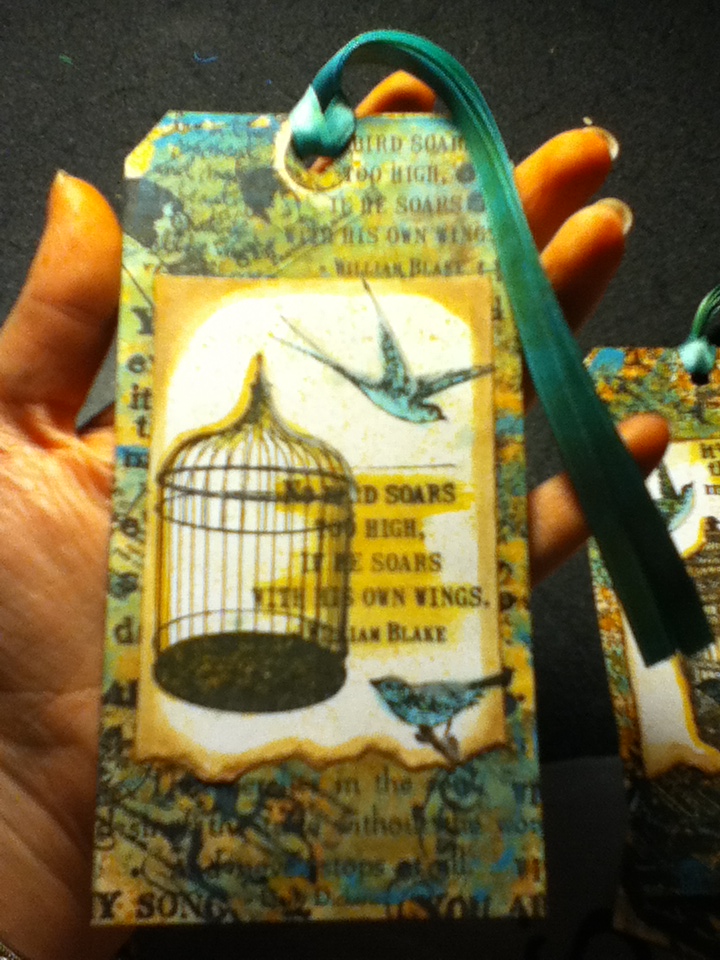

Tag 1...


Tag 2...


Tag 3...


Very shabby chic and all ready for swapping!